With the holidays around the corner, and our families planning their visits, I decided it was time to get to work on our guest room. You might remember that we just purchased our home not too long ago, so it’s still getting put together. To top that off we are recent college grads, and much of what we have is hand me downs or thrift store finds.
Our guest room consisted of… well nothing! Haha! We didn’t even have a bed for it, we had to start from square one all while keeping our budget in check. After the bed situation was solved I found a great deal on my local Craigs list (which I LOVE btw) for two small black chairs. The chairs had been used in a waiting area of an office that closed, but I thought they were cute, and the price was GREAT! The fabric on the chairs however, not so much!(that’s another project)
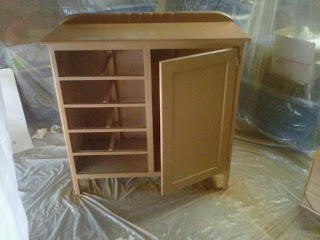
So anyways, on to the dresser. I had a dresser sitting in our garage for quite some time (well it use to be in storage) It was my sons dresser that my mom had painted for him. Before that it was my youngest sisters dresser. It’s a very solid piece and I am happy I decided to keep it. Check out how cute it was for my rock star! (yes that's chalk board paint on the door and blocks turned knobs. My moms amazing)
Keep in mind this is really my first furniture re do, or as some people say up cycle. With the exception of my desk I guess. (yet another project I should post) I didn’t really know what I was doing. I of course googled a few things, and called mom and dad. I needed to know things like what paint to use, do I need to sand and prime (the answer is YES) etc. (Have I mentioned that my parents are professional painters, yea I call them a lot. “mom how do I do this” “Dad how do I do that” I’m sure they are sick of me by now.) So after I decided I was going to paint this gold with black crackle I set out to Lowes to get the supplies. I got primer, gold paint, black paint, crackle glaze, and a protective top coat. Then I got to work.
My first time using my spray gun was with the primer. It was a lot of trial and error to say the least. I also got a crash course in a clogged spray gun. GRRRRR Luckily my hubby helped me take it apart and clean it. Thanks babe! For anyone who is also just learning, I recommend thinning out the primer/paint at a rate of about 3oz of water per half quart of paint/primer. Of course I am no expert and this may not be correct, but it worked for me, and I am happy with that. After I primed it, I let it dry overnight. Then I used the same technique to put my gold color paint on. The color reminded me more of someone who tanned too much, rather than a gold but I went with it (trial and error right?!?!)
After I let the gold paint dry overnight I brushed on the crackle glaze. This part needed to be done with a brush. A good tip for those of you who are doing this for the first time, when you apply your crackle glaze if you paint in a very neat “row, after row” or straight lines, your end result will produce a very neat (as in tidy) crackle pattern, If you kind of slop on the crackle paint and brush it around, you will have a random crackle pattern. Personally I like how the very straight cracks look. After the crackle glaze has dried for 1-4 hours you can paint your top color on. This will also need to be done with a brush. When you apply the top color make sure you don’t back brush if you do the crackle will be less likely to work.
After the top color dries overnight you can apply the clear protective coat. I used my spray gun for this, but it could be done by hand too. Now all you need to do it let it dry and you are done!
My dresser is up in the guest room, but I have yet to get knobs for it. Well yet to find knobs I like! I plan to make the hour drive to my “local” Hobby Lobby next week, I am sure I will find something there.
UPDATE! I have found knobs! The last 6 of their kind :D it was fate ;) Oh yea, that and they were %50 OFF YAY! Hobby Lobby always has such great deals! I thought they were so pretty!
Dresser is almost done. I just need to put the latch on the door, and it's done. :D What do you think? (sorry for the bad pics, all I have is my camera on my phone. The hubby took our camera for his trip) I think I will stop downtown to the local glass store and see how much it would be to have a mirror cut for the door. Maybe etch some floral design onto it? I'm not sure, it just needs something, don't you think?
Dresser is almost done. I just need to put the latch on the door, and it's done. :D What do you think? (sorry for the bad pics, all I have is my camera on my phone. The hubby took our camera for his trip) I think I will stop downtown to the local glass store and see how much it would be to have a mirror cut for the door. Maybe etch some floral design onto it? I'm not sure, it just needs something, don't you think?


No comments:
Post a Comment