Monday, October 31, 2011

Happy Halloween!

Happy Halloween!!!

My hubby and I spent the majority of the day insulating our garage apartment, but we did manage to take our Rock Star, who went as a ghost, trick-or-treating tonight.  I have noticed a trend here in our little Oklahoma City, where the parents drive their kids from house/block to house/block.  Now when we were kids our parents either walked with us or when we were older sent us on our merry way! Any who, we had a great time! Hope you all had a great time too!
I wanted to remind you that the drawing for my first ever giveaway will be tomorrow! All you need to do to be entered to win is follow my blog :D
The prize is a hand etched coffee/tea mug, coco, and a handmade holiday card. If we get 30 followers I will give away two sets! If we get to 40 followers I will give away 3 sets! Be sure to follow and good luck!

Saturday, October 29, 2011

Coupons!

     I wanted to take a moment to post a coupon I found for Hobby Lobby. If you have Facebook, head over to the Hobby Lobby Facebook page found Here, and locate the coupon tab on the left hand side (you might need to "like" their page first).  They occasionally post a coupon. YAY! They currently have a 40% off one regular priced item, which I used  yesterday when I went.
     Also a reminder, if Hobby Lobby doesn’t have what you need (is that even possible) Jo Ann’s accepts competitor coupons. However, I have never needed to use a competitors coupon at Jo Ann’s because they send out a flyer with some great coupons on it, but the option is there.
     Speaking of Jo Ann's They have an online promo code that can also land you 40% off a regular priced item. Check out their site, here, to get it. Also remember that Jo Ann's Friends and Family sale is November 4-6th. 
If you are wondering how you can get the latest sales and coupons from Jo Ann's here is how:
     Sign up for email here (located at the bottom left page).
     Sign up for their mailing list here.
Happy couponing!

Thursday, October 27, 2011

Good Thursday Morning! (10/27/2011)

image from etsy.com

ONLY 5 days until I draw the winner of the giveaway! YAY! The prize will be: a hand etched coffee/tea mug, hot coco, (possibly some handmade fudge) and a cute handmade holiday card!!! Keep it all for yourself or give it as a gift this holiday!
Remember all you need to do to win is follow my blog! Thanks!

Drawing will be November 1st.

Thursday, October 20, 2011

Fall Cards


WELCOME FALL!
Image Property of  
spartansusscraper.blogspot.com 

It has finally cooled down here in the south! Well a little bit I guess, we are talking 60’s. Up home in WI they are getting down to the 20’s (oh how I miss that!)  The hubby just got back from his trip to WY, where he said they had flurries- Jealous!!  
But anyways, I am in the mood for fall activities! I’m talking cooking crafts and a pumpkin patch! Last night I made a stuffed pork loin, sweet potatoes and apple pie! YUM!  So my plans for the day are to take my kitty cat to the vet, and then head to Hobby Lobby (YAY) and get some fall inspired paper. After all my new cricut is longing to be used! So I was looking online for some inspiration, and I found the cutest scarecrow card on http://spartansusscraper.blogspot.com  (awesome blog) I plan on making something similar.

Alright, here they are...
(yes they are very similar to those on the spartansusscraper blog, but what can I say I loved hers! Mine aren't quite as cute, but for my first card using my cricut I am happy, and I am sure my family will love them!)


Remember to follow my blog  for a chance to win a handmade gift! Drawing will be November 1st!

Wednesday, October 19, 2011

Happy Wednesday! (10/19/2011)

So a few things on this Wonderful Wednesday:
First, DON’T FORGET to follow my first ever blog, All With a Manicure, for your chance to win something hand crafted by yours truly. The drawing will by November 1st, and the prize is to be determined.
Second, please forgive the lack of posts. I am getting ready for company, dealing with a broken (and now fixed) central air unit, along with dealing with a sick cat. Oh yea that and I had a mini emergency at the house which required me to obtain almost a ton of gravel, get it to my house, and unload it by HAND, alone I might add… so THAT took up quite a bit of my time lately. But I will try to get more pics of my projects, and new posts up as soon as I can. Thanks for waiting! :D
Third, I wanted to thank you all for taking time out of your very busy day to look at my first ever blog. I appreciate those of you who have also taken time out to follow it. As a first time blogger, it feels great to watch as the “followers” count grows. Thank you!

Thursday, October 13, 2011

Block Letters DIY

Block Letters
A DIY tutorial

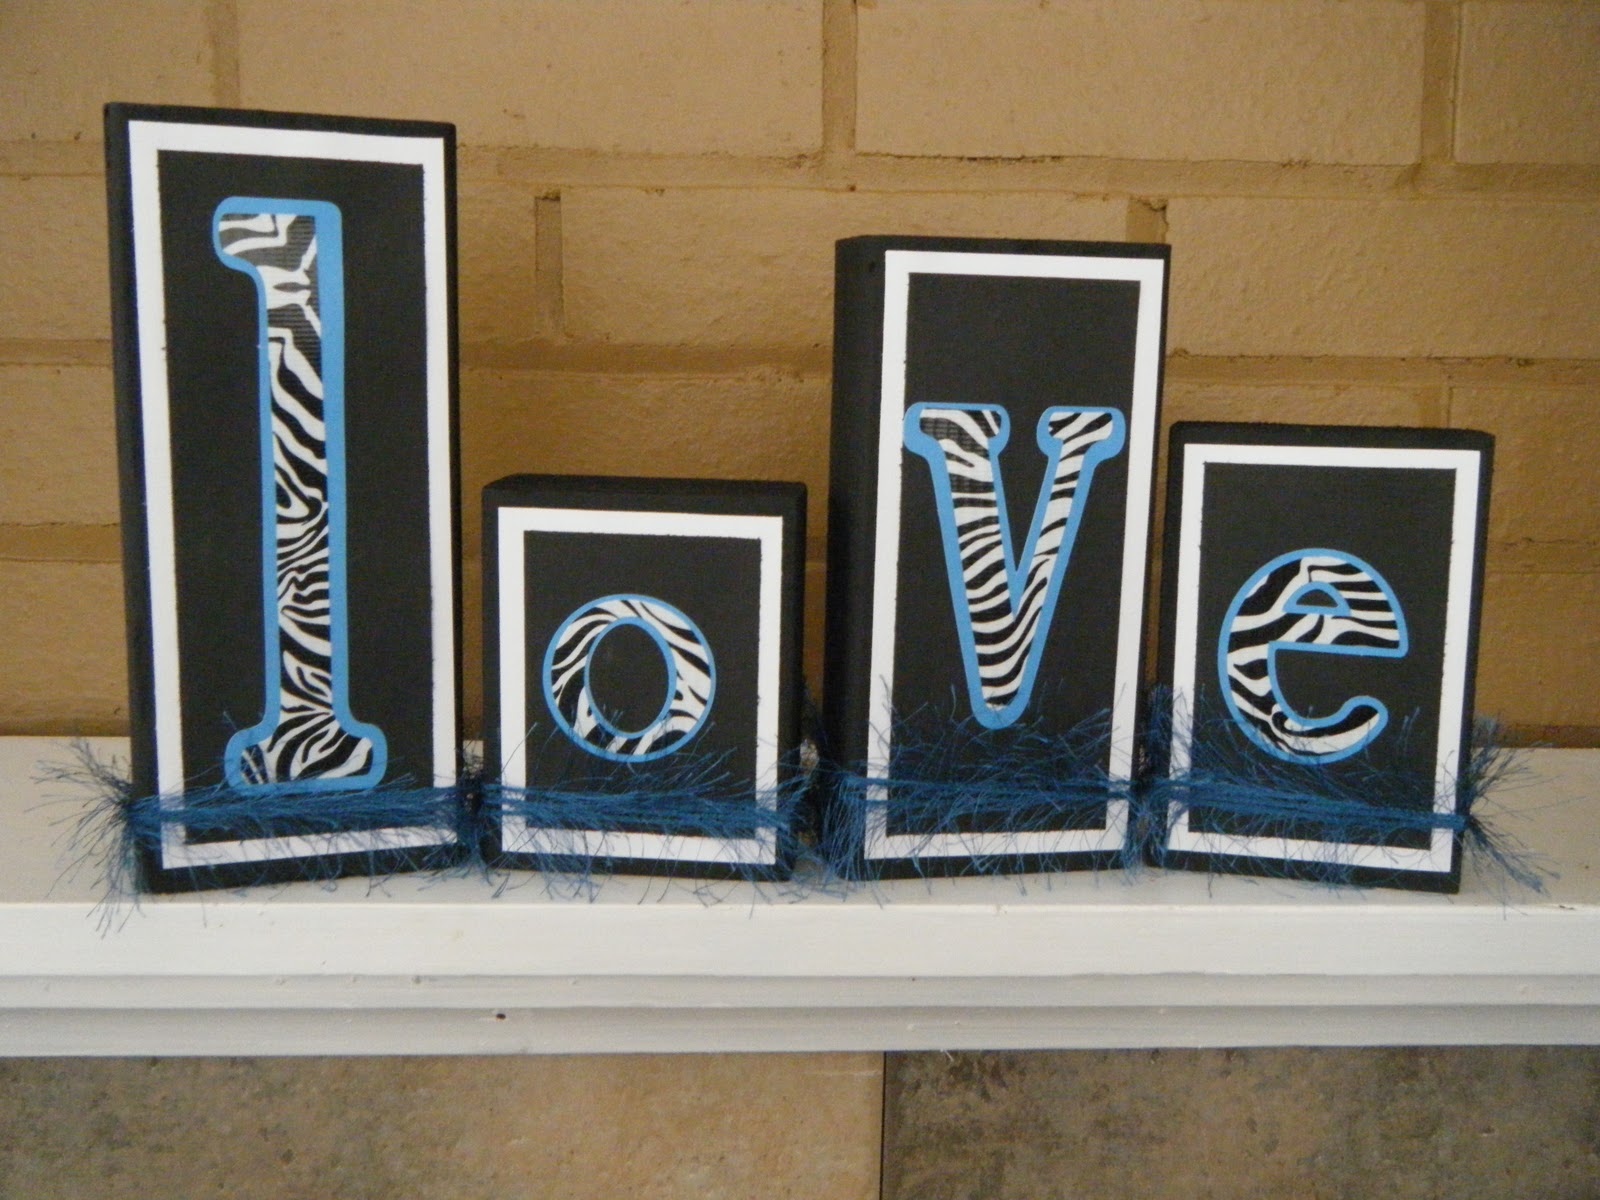
So I saw these at the last craft fair I was at, UBER cute block letters. They are wood blocks with letters painted on them to spell out things. CUTE! I thought, "I could so make something like that!" So I did ;)
Here is what you will need:
*Wood blocks, size is up to you (I used scrap lumber in our garage and cut it to size)
*Paint
*Scrapbook paper
*Glue (I used mod podge- love that stuff)
*Scissors
You will also need a way to make the letters, such as
*stencils
*pre-cut letters (can find these in the scrap book supplies at most craft stores)
*Circut ( I used my BRAND NEW Cricut for this project- YAY)


Cut your wood into blocks. I cut several sizes, so I have a variety to choose from.


After you cut your wood blocks to the size you want, practice arranging them. You can line them all up, stack them, set them up however you want!

Next, pick the paper you want to use. Then pick out the paint you want.

Then paint your blocks. I painted the 3 sides, and a bit of the front and back. I did 2-3 coats of paint.

After the paint dries, measure the front of the block and cut your paper to size. I left a bit of the color showing on the front of the paper. Again, up to you.
After you cut your paper to size, check to see that it fits to your liking. If it does glue it on to the front.

Do this for all of the blocks.
I also did this for the back of the blocks, and added a cute little “Crafted by Melissa Jean” onto the bottom of the back.

Now you get to cut your letters out. Size, font, color, etc is all up to you. I like the quirky mismatched upper and lowercase look, so I went with that. I also made a shadow for each of my letters.
Glue the letters onto the blocks.

You can leave your blocks like this if you want (they look pretty cool huh) But I wanted to add a little something more. I used some ribbon I already had, and wrapped them a few different ways. I used hot glue for this step.

CHECK THEM OUT! (the “give thanks” still needs to be embellished)

Happy DIY

Here are a few more of my block letter creations...


Sunday, October 9, 2011

Giveaway Time!


Image "giveaway time" courtesy of http://www.manoneileen.com/ 

 In order to celebrate my very first blog I have decided to do my very first giveaway!

Q: How do I enter you may wonder?
A: For my first give away, all you need to do is follow my blog and you will be entered to win in my first ever give away.

Q: When is the drawing?
A: The drawing will be November 1st, 2011.

Q: How do you draw?
A: I will use Random.org to draw a random number. Each person who has followed my blog by November 1st,will have a number assigned to them, via list form.

Q: What do I win?
A: Good question! Not quite sure at the moment, but it will be home made for sure :D

GOOD LUCK!

Please be sure to check the GIVEAWAY page often for new giveaways :D

DIY Roman Shades


Any one LOVE the look of custom roman shades? I DO! Now what about the cost? YIKES!  Well thanks to a wonderful site I stumbled across, Little Green Notebook, I learned how to make my very own roman shades. Big deal you say. You can get patterns and do this right. Well yes, but how about making them for as little as 5 bucks?! WHAT?! Do I have your interest now? :D thought so!
So here’s the deal. These custom looking roman shades are made from material of your choice and mini blinds (oh and glue too). There is no sewing involved, which is great if you’re a beginner like myself, or maybe if you don’t own a sewing machine. Whatever the case, these are fun and easy to make. Oh yea they look great too!
You will need to measure the window(s) you will be making these for, and then get the appropriate size blinds and the correct amount of fabric. I recommend going to Family Dollar, Big Lots, or something of the like as mini blinds can run as low as 3 bucks a pop! Walmart isn’t bad either for about 6 bucks a pop. There is no need to spend a ton on the blinds because you will be tearing them apart any ways- This could be a great way to jazz up your mini blinds, or even salvage mini blinds in rough shape :D  Take a look at my BEFORE windows....

Kitchen Window Before (see my helper Jack)
Laundry Room Windows
Now if you want to make these for UBER cheap, check out your local thrift store for some blankets or sheets. If you get a quilted blanket, it will provide some insulation, a nice plus for an already great deal! For the windows in my kitchen I picked out fabric from my local Jo Ann store. I had some %50 off coupons, so I used those :D For the windows in the laundry room I used my birthday gift card (from my wonderful in-laws) and got the material from Michaels. Either way it was a great deal.
The article I read that inspired me to make these doesn’t have you line the shades, but I went ahead and purchased the cheapest white fabric I could find just to line the back of the blinds. I thought it would help keep the sun from washing out the color and help keep our house a more comfortable temp. This step is up to you of course. If you are planning on lining them, you can buy pretty much any ol' fabric to do this with but I do know they have insulated fabric too. Just a thought.

So any ways after you have  your window measurements, you will need to decide how many pleats, or folds you want your blind to have when you roll it up. This is the number of blind slats you will need to leave on the strings. The rest will come off. In order to take off the rest of the slats, you will need to extend the blinds fully and remove the bottom slat. To remove the bottom slat, take the small plastic plugs out of the holes on the bottom, then untie the knots from the cord and slid the bottom slat off.
Next cut the “ladder cord” ONLY THE LADDER CORD! Do NOT cut the thick cord, as this is what will pull the blind up and down. I took the advice of the other article and just ran my scissors up the ladder cord. Remove the cut ladder cord fragments. Next remove the blind slats, leaving only the number of slats you have chosen for the folds.  
Now put the bottom slat back on the cords, then measure the length you want your blind to be and tie a knot at that point.(do this on both sides) I wanted my blinds to be flush with my windowsill, so I didn’t leave any extra at the bottom. The length is up to you. You should now have something that looks like this... (the extra slats are pushed up at the top)

After you have re assembled your blind lay out your fabric, right side down and put your blind on top of it.
A few important notes:

You may need to iron your fabric/blanket. If you need to do that, do it before you start gluing.
If your fabric has a pattern, make sure it is straight at the top of your blind. For example, if you have a row of flowers in the pattern, make sure your blind is lined up straight on that row, otherwise when you hang the blind, it will look like it’s hung up crooked. This is one of the trial and error things I talk about.
Also, as the article from Little Green Notebook states, do not use hot glue for this project. I used Tacky glue, and its holding up fine so far. I love tacky glue :D
If you are going to line your fabric, just cut the liner and fabric to the same size and glue them together using your glue. You can just glue around the outer edge, that will be fine. Proceed with the project.

After you have double checked that your blind and fabric are straight, position your slats where you want them. There is no right or wrong way to do this really, just make sure they are straight. To check to make sure they are straight, just measure from the top down. They should be equal distance down on each side. I found that two tape measures helped me a lot.

Now it’s time to bust out the glue :D  I started gluing at the top. MAKE SURE you do NOT glue the fabric to the two very ends of the top of the blind. You will need to be able to hang them later. (there’s that trial and error thing again) You can glue it after it is hung if needed. Next just glue the slats to the fabric, working your way down to the bottom slat. Do NOT get glue on the cord, as this will prevent the blind from working.

After all the slats have been glued to the fabric, fold over the edges and glue those down too. YOU ARE ALMOST DONE!


Now just let this dry over night!!!!! It needs to be good and dry before you hang it up.
You can also add some trim on the top or bottom to jazz them up a bit. I added red trim to the top of my shades in the laundry room.


Happy DIY
Special thanks to the http://littlegreennotebook.blogspot.com/ for my inspiration!

Saturday, October 8, 2011

Dresser Overhaul


 With the holidays around the corner, and our families planning their visits, I decided it was time to get to work on our guest room. You might remember that we just purchased our home not too long ago, so it’s still getting put together. To top that off we are recent college grads, and much of what we have is hand me downs or thrift store finds.  
Our guest room consisted of… well nothing! Haha! We didn’t even have a bed for it, we had to start from square one all while keeping our budget in check. After the bed situation was solved I found a great deal on my local Craigs list (which I LOVE btw) for two small black chairs. The chairs had been used in a waiting area of an office that closed, but I thought they were cute, and the price was GREAT! The fabric on the chairs however, not so much!(that’s another project)
So anyways, on to the dresser. I had a dresser sitting in our garage for quite some time (well it use to be in storage) It was my sons dresser that my mom had painted for him. Before that it was my youngest sisters dresser. It’s a very solid piece and I am happy I decided to keep it. Check out how cute it was for my rock star! (yes that's chalk board paint on the door and blocks turned knobs. My moms amazing)

Keep in mind this is really my first furniture re do, or as some people say up cycle. With the exception of my desk I guess. (yet another project I should post) I didn’t really know what I was doing. I of course googled a few things, and called mom and dad. I needed to know things like what paint to use, do I need to sand and prime (the answer is YES) etc. (Have I mentioned that my parents are professional painters, yea I call them a lot. “mom how do I do this” “Dad how do I do that” I’m sure they are sick of me by now.)  So after I decided I was going to paint this gold with black crackle I set out to Lowes to get the supplies. I got  primer, gold paint, black paint, crackle glaze, and a protective top coat. Then I got to work.

My first time using my spray gun was with the primer. It was a lot of trial and error to say the least. I also got a crash course in a clogged spray gun. GRRRRR Luckily my hubby helped me take it apart and clean it. Thanks babe!  For anyone who is also just learning, I recommend thinning out the primer/paint at a rate of about 3oz  of water per half quart of paint/primer.  Of course I am no expert and this may not be correct, but it worked for me, and I am happy with that. After I primed it, I let it dry overnight. Then I used the same technique to put my gold color paint on. The color reminded me more of someone who tanned too much, rather than a gold but I went with it (trial and error right?!?!)

After I let the gold paint dry overnight I brushed on the crackle glaze. This part needed to be done with a brush. A good tip for those of you who are doing this for the first time, when you apply your crackle glaze if you paint in a very neat “row, after row” or straight lines, your end result will produce a very neat (as in tidy) crackle pattern, If you kind of slop on the crackle paint and brush it around, you will have a random crackle pattern. Personally I like how the very straight cracks look. After the crackle glaze has dried for 1-4 hours you can paint your top color on. This will also need to be done with a brush. When you apply the top color make sure you don’t back brush if you do the crackle will be less likely to work.


After the top color dries overnight you can apply the clear protective coat. I used my spray gun for this, but it could be done by hand too. Now all you need to do it let it dry and you are done!
My dresser is up in the guest room, but I have yet to get knobs for it. Well yet to find knobs I like! I plan to make the hour drive to my “local” Hobby Lobby next week, I am sure I will find something there.
UPDATE! I have found knobs! The last 6 of their kind :D it was fate ;)  Oh yea, that and they were %50 OFF YAY! Hobby Lobby always has such great deals! I thought they were so pretty!

Dresser is almost done. I just need to put the latch on the door, and it's done. :D What do you think? (sorry for the bad pics, all I have is my camera on my phone. The hubby took our camera for his trip) I think I will stop downtown to the local glass store and see how much it would be to have a mirror cut for the door. Maybe etch some floral design onto it? I'm not sure, it just needs something, don't you think?


Friday, October 7, 2011

A Friday Frugal Find

A Friday Frugal Find


Haha do you like that title ;) Any ways thought I would share with you a great deal. (well I got excited about it any ways)
Cottonelle 12 rolls for $3.50 at Walgreens
Heres how:
Cottonelle 12 rolls are $5 at walgreens
Use their $1 in store coupon, found in their October savings book
Use the .50 off manufacture coupon found here

Voilà 12 rolls of Cottonelle Toilet Paper for $3.50

Happy Friday!

Welcome!

Welcome! My name is Melissa Jean, and this is my blog, All with a Manicure. I plan to have my blog contain my DIY projects, cooking fun, some frugal finds, and all of my learning experiences along the way.
A bit about myself, and my first ever blog (that’s right this is my FIRST blog-eek! :) Try not to critique too hard) First of all, the title, “All with a Manicure” is a bit misleading. I very rarely have my nails done, not that I don’t LOVE to get manis, I just ruin them the second I get them done! Being a busy mom of an almost 5 year old boy, and loving to craft, pretty nails and I don’t mix.  If you had hopes to find pretty nails on this blog, I am sad to tell you that you may be let down. Then why the name you ask…. Good question!
Oh, and yes I said a mom to an almost 5 year old boy. Some of you may know what that means: dirt, cuts, bruises, bikes, sports, pretty much craziness! Who am I kidding? My son is as good as they come, but I am bias. ;)  I am also a wife to an amazing and very patient man. (Lord knows he needs to be with me as a wife) Although my hubby isn’t home much, because his job requires him to be gone a lot (big sad face) when he is home he never complains about my crazy projects, or pulling the car over so I can pull something out of some ones garbage. Yes I really do that.
One last note worth mentioning, I am horrible with grammar, spelling, well let’s just say writing in general. Let me take a moment to apologize about all of the above.
Now let’s get on with the DIY shall we!