Block Letters
A DIY tutorial
So I saw these at the last craft fair I was at, UBER cute block letters. They are wood blocks with letters painted on them to spell out things. CUTE! I thought, "I could so make something like that!" So I did ;)
Here is what you will need:
*Wood blocks, size is up to you (I used scrap lumber in our garage and cut it to size)
*Paint
*Scrapbook paper
*Glue (I used mod podge- love that stuff)
*Scissors
You will also need a way to make the letters, such as
*stencils
*pre-cut letters (can find these in the scrap book supplies at most craft stores)
*Circut ( I used my BRAND NEW Cricut for this project- YAY)
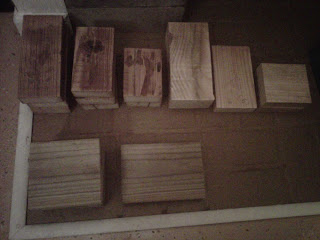
Cut your wood into blocks. I cut several sizes, so I have a variety to choose from.
After you cut your wood blocks to the size you want, practice arranging them. You can line them all up, stack them, set them up however you want!
Next, pick the paper you want to use. Then pick out the paint you want.
Then paint your blocks. I painted the 3 sides, and a bit of the front and back. I did 2-3 coats of paint.
After the paint dries, measure the front of the block and cut your paper to size. I left a bit of the color showing on the front of the paper. Again, up to you.
After you cut your paper to size, check to see that it fits to your liking. If it does glue it on to the front.
Do this for all of the blocks.
I also did this for the back of the blocks, and added a cute little “Crafted by Melissa Jean” onto the bottom of the back.
Now you get to cut your letters out. Size, font, color, etc is all up to you. I like the quirky mismatched upper and lowercase look, so I went with that. I also made a shadow for each of my letters.
Glue the letters onto the blocks.
You can leave your blocks like this if you want (they look pretty cool huh) But I wanted to add a little something more. I used some ribbon I already had, and wrapped them a few different ways. I used hot glue for this step.
CHECK THEM OUT! (the “give thanks” still needs to be embellished)


I have always wondered how the cricut works. I am an artist and sometimes need stencils. Would I be able to cut out stencils from firm plastic sheets and how big can it cut?
ReplyDeleteElsa,
ReplyDeleteThanks for checking out my blog! That is a great question. I just got my Cricut today, so let me look into that and get back to you about it.
Melissa
Melissa these blocks are so great. I am a cardmaker and have tons of dies and the cuttlebug. Would LOVE to own the cricut but we are moving in a year into our 40 ft. 5th wheel and just don't think I have room for everything that I have now...lol You are VERY creative. Love it
ReplyDeleteLOVE it all!!!
ReplyDeleteSo cute!!! I need to do this when I find the time!
ReplyDeleteElsa,
ReplyDeleteSorry it took me so long to get back to you regarding the Cricut. I have had family visiting and a sick kitty. Anyways, to answer your question you can buy a special “deep cutting” blade and housing. This will cut things like chip board and foam and magnet sheets! What a great tool! In addition you can also buy markers to draw, rather than cut. The Cricut is so versatile!
I hope I answered your question.
Thanks again for following my blog!
Melissa Jean